Making your AI Videos
Upload Images
Upload your images from your local computer or cloud storage. You are currently limited to a maximum of 20 images for a single video, but can use less if you would like.
IMPORTANT REGARDING IMAGE QUALITY: The AI model "looks" at the images you upload, rather than uses the exact files, to then generate the video. Therefore, uploading very hi-res images does not result in a better video output. Any images that are ready to use on a website will be good enough to upload to our AI.
You will notice each image has a progress loading bar on the thumbnail to show you when they have completed uploading.
You will also notice the credit calculation next to the "Create Video" button totalling the number of credits required to process the video, based on the number of images you have uploaded (1 image = 15 credits)
Arrange Images in Order
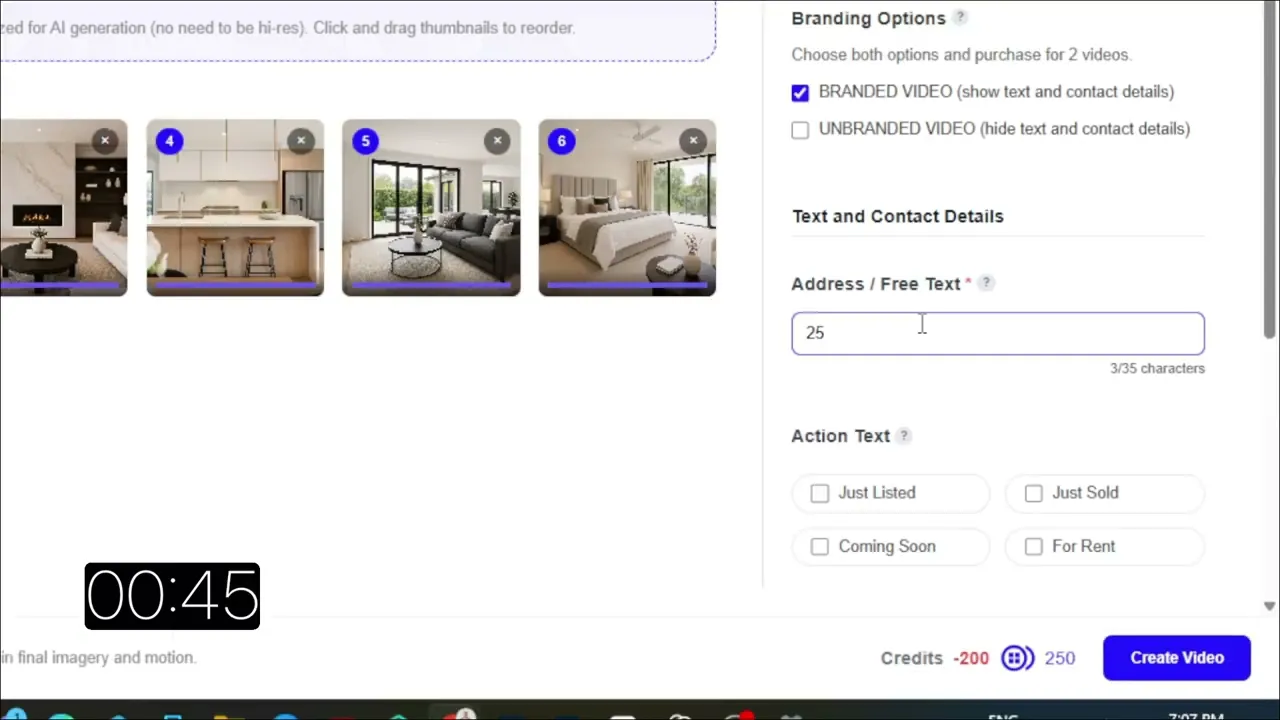
Once your images are uploaded, you will see a number in the top left of the thumbnail, which tells you the order that images will be processed in the video.
Drag and drop the thumbnails to reorder the images as you want them to appear in your video. The sequence runs from left to right, top row to bottom row.
The FIRST image will have your dynamic text (address, status) animated over the top if its video clip
The LAST image will have the contact details (profile pic, name, email, agency logo) animated over the top of it.
You can delete a thumbnail / image and replace it at this stage before generating the video, but not afterwards.
Customizations
Title (Mandatory): This is what will appear in your Library and is only visible to you. Use this to organise your videos how you would like (by property address, client name, etc.)
Branding
BRANDED: Shows the Address/Text and Action Text over the first clip, and contact details over the last clip. Has a choice of background music.
UNBRANDED: Has no text, contact details or background music - just AI video clips.
BOTH: Produces a Branded and Unbranded video at the same time (you will be charged for 2 videos)
Free Text / Address: This will appear on the first clip in your video. Best used for property address (e.g. street number, street name and city/town) or opening title. Limited to 36 characters.
Action Text: Choose a pre-written message to add underneath the address in the opening clip, such as Just Listed, Just Sold, Coming Soon or For Rent. More options will be added over time.
Background Music: Choose a background music track for your video. Unbranded videos have no background music.
Persona: Choose the contact details to use at the end of a branded video - your own, or those from a Persona you have already created.
Aspect Ratio: This is the orientation of your finished video. Select 16:9 for HORIZONTAL orientation (landscape) useful for web and YouTube, or 9:16 for VERTICAL orientation (portrait) for social media feeds, Reels and Stories.
Create Video
Click the "Create Video" button yo start the video creation process. You will be charged the required credits for your video/s at this time.
You will see a confirmation telling you that it has successfully started, and be returned to the Library, and a Notification will appear top-right.
In the Library, you will see a card for the video being created, but the thumbnail will read "Processing"
When the video is ready you will:
Have the required number of credits deducted from your balance.
Get an email confirming the video has completed
Receive a Notification
See the Library screen refresh and the thumbnail of the newly processed video will now be visibile.
Download or Share
Click on a video from the Library view to open the video details and play the video
Click "Download" to save the video file to your local or cloud storage
Click "Copy Link to Share" to copy a link to the video (hosted on VAIRE) that you can paste into spcial media posts, emails, etc.
Video Generation Problems
If you experience a video that doesn't successfully generate (a "processing" or "failure" status message), then you will be credited back the spent credits automatically within 1-2 hours for this temporary interruption.